74 KiB
#structure/global Randy Ingermanson invented the Snowflake Method in the summer of 2002.
The problem the Snowflake Method solves is "How do you get the first draft of your novel written?"
Note that there are many possible answers to that problem. The Snowflake Method is my answer, and it's been immensely popular. My "Snowflake Method" page on my website has been viewed more than 6.5 million times over the years, and it's made me famous around the world as a teacher of "how to write fiction."
I've also written a best-selling book, How to Write a Novel Using the Snowflake Method, which you can buy at any of the usual online retailers. The book is written as a story. It's the story of a young woman who always wanted to write a novel, but didn't know how. The story is written in fairy tale format, and it's pretty crazy and very silly. That's for a reason. The crazy, silly story makes it easy to remember.
Let's remember that there are other ways to write your first draft. If the Snowflake Method works for you, then that's a win. If some other method works for you, that's also a win. In the end, your reader won't care how you wrote your first draft. Your reader only cares if your novel gives them a powerful emotional experience.
You might be wondering why it's called the Snowflake Method. I'm glad you asked...
Why It's Called the "Snowflake Method"
I have a PhD in theoretical physics and have worked as a software developer to write many complex scientific software projects over the years.
When faced with a new challenge, a software developer starts with something small and builds out.
Here's a metaphor for how to do that.
Imagine you're asked to draw the following complicated "Snowflake fractal":
How could you possibly draw that?
You could just put your pencil down on the paper and start drawing, but ... it's complicated! There must be an easier way.
There is an easier way. Instead of trying to draw the whole complicated image in one shot, you can start with a simple triangle:
That's not much, but it's a start. You can build from that. All you have to do is erase the middle part of each side and then add a triangle projecting out. Like this:
That's still not much, but it's more than what you started with. Now you can again erase the middle of each edge and replace it with a triangle again. Like this:
That's starting to look like something! Now you just keep repeating the process, erasing the middle of each edge and adding more tiny triangles. Like this:
You can see that in just a few steps, you've made enormous progress. At each step, all you did was either erase a bit of a line segment or draw a triangle. Each step was easy, but the whole is so much more than the sum of the parts.
You can take as many steps as you like, but very soon, you'll be adding triangles smaller than the thickness of your pencil. That's when it's time to stop. And you'll have this:
All of this is a deep metaphor for how you design a novel before you begin writing it.
You start with the basic idea of the novel. Then you make it a bit more complex. Then a bit more complex. Then a bit more. After doing that just a few times, you have the skeleton of a beautiful, perfectly-designed novel.
Once you have that, you can sit down and start writing.
The Snowflake Method has 10 steps. Step #10 is to write your novel.
Here in this template, we'll work through the other 9 steps. You can do each of these nine steps right here in Plottr.
Just follow the guidelines in the notes below. Each step will tell you to do one task, and it will tell you which part of Plottr to use to complete that task. Just follow your nose, and in a few hours of intense, creative work, you'll have a beautiful and elegant design for your novel.
Step 1: Explanation of the One-Sentence Summary
Take an hour and write a “Storyline” — a one-sentence summary of your novel. Something like this: “A rogue physicist travels back in time to kill the apostle Paul.” (This is the summary for my first novel, Transgression.) Your Storyline will serve you forever as a ten-second selling tool. This is the big picture, the analog of that big starting triangle in the snowflake picture.
When you write your book proposal, this Storyline should appear very early in the proposal. It’s the hook that will sell your book to your editor, to your publishing committee, to the sales force, to bookstore owners, and ultimately to readers. So make it the best one you can!
Some hints on what makes a good Storyline:
- Shorter is better. Try for fewer than 15 words.
- No character names, please! Better to say “a handicapped trapeze artist” than “Jane Doe”.
- Tie together the big picture and the personal picture. Which character has the most to lose in this story? Now tell me what he or she wants to win.
- Read the one-line blurbs on the New York Times Bestseller list to learn how to do this. Writing a one-sentence description is an art form.
If you want more details on the one-sentence summary, see Chapter 3, "Your Story in One Sentence," in my book How to Write a Novel Using the Snowflake Method.
Step 2: Explanation of the One-Paragraph Summary
Take another hour and expand your one-sentence summary to a full paragraph describing the story setup, major disasters, and ending of the novel. This is the analog of the second stage of the snowflake. I like to structure a story as “three disasters plus an ending.” Each of the disasters takes a quarter of the book to develop, and the ending takes the final quarter. I don’t know if this is the ideal structure, it’s just my personal taste.
If you believe in the Three-Act Structure, then the first disaster corresponds to the end of Act 1. The second disaster is the mid-point of Act 2. The third disaster is the end of Act 2 and forces Act 3, which wraps things up. It is OK to have the first disaster be caused by external circumstances, but I think that the second and third disasters should be caused by the protagonist’s attempts to “fix things”. Things just get worse and worse.
You can ultimately use this paragraph in your proposal. I recommend that you write a paragraph with five sentences:
- The first sentence tells the backdrop and story setup.
- The second sentence explains the beginning up to the first disaster.
- The third sentence describes the first half of the middle, up to the second disaster.
- The fourth sentence describes the second half of the middle, up to the third disaster.
- The fifth sentence explains the ending.
If you want more details on the one-paragraph summary, see Chapter 5, "The Importance of Being Disastrous," in my book How to Write a Novel Using the Snowflake Method.
Step 3: Explanation of Your Character Definitions
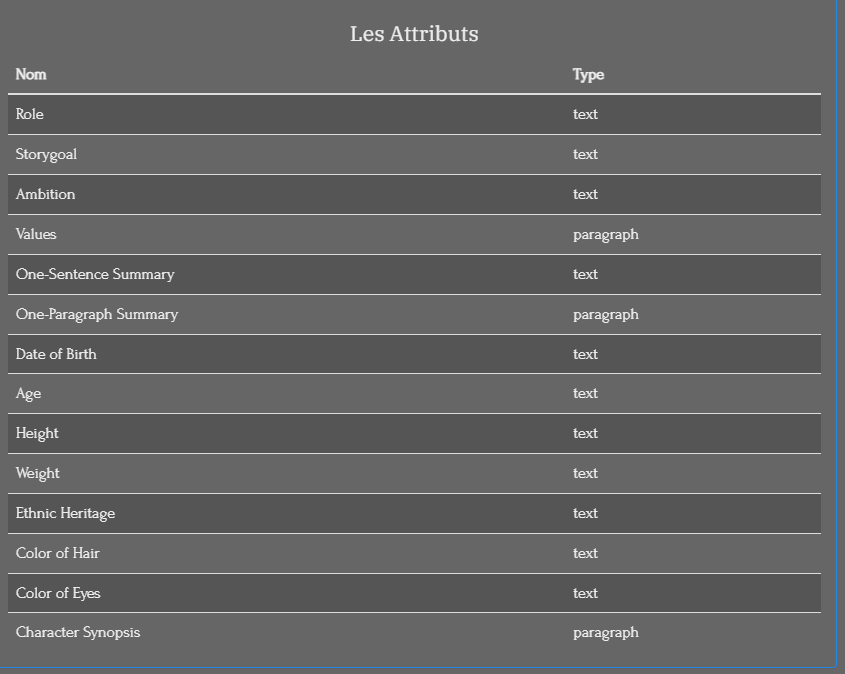
In the first two steps of the Snowflake Method, you’ve worked out a high-level view of your novel. Now you need something similar for the storylines of each of your characters. Characters are the most important part of any novel, and the time you invest in designing them up front will pay off ten-fold when you start writing. For each of your major characters, take an hour and fill out the beginnings of a character sheet. You don't need to define everything about these characters. Just the really important stuff, such as:
- The character’s Name
- The character's Role in the story (Hero, Villain, Love Interest, Sidekick, or whatever role you want to assign. Or none at all.)
- The character’s Storygoal (what does the character want concretely?)
- The character’s Ambition (what does the character want abstractly?)
- The character's Values (each Value can be summarized in a single sentence of this form: "Nothing is more important than _________.")
- A one-sentence summary of the character’s Storyline (write this as if this character is the Hero of the story. Remember that every character thinks they are the Hero of their own story. Even the Villain thinks so.)
- A one-paragraph summary of the character’s storyline (again, write this as if this character is the Hero of the story.)
An important point: You may find that you need to go back and revise your one-sentence summary and/or your one-paragraph summary that you did in Steps 1 and 2. Go ahead! This is good — it means your characters are teaching you things about your story. It’s always okay at any stage of the design process to go back and revise earlier stages. In fact, it’s not just okay — it’s inevitable. And it’s good. Any revisions you make now are revisions you won’t need to make later on a clunky 400-page manuscript.
Another important point: It doesn’t have to be perfect. The purpose of each step in the design process is to advance you to the next step. Keep your forward momentum! You can always come back later and fix it when you understand the story better. You will do this too, unless you’re a lot smarter than I am.
Step 4: Explanation of your One-Page Synopsis
If you’ve done the first three steps of the Snowflake Method, you should have a good idea of the large-scale structure of your novel. So now just keep growing the story.
Take several hours and expand each sentence of your one-paragraph summary (from Step 2) into a full paragraph. All but the last paragraph should end in a disaster. The final paragraph should tell how the book ends.
Write your one-page synopsis in the present tense, like this: “Jack sells his cow in town for some magic beans. When he comes home, his mother throws the beans out the window . . .”
This is a lot of fun, and at the end of the exercise, you have a pretty decent one-page skeleton of your novel, which we’ll call a short synopsis or a one-page synopsis. It’s okay if you can’t get it all onto one single-spaced page. What matters is that you are growing the ideas that will go into your story. You are expanding the conflict.
It's also okay if you can do your one-page synopsis quicker than the "several hours" I recommended above. But you don't want this to drag out for days or weeks. Write it fast, and remember that you can always come back and make it better later when you understand your story better.
Eventually, you might expand this into a synopsis suitable for a proposal, or you may find that this is all the synopsis you need. You can decide that question later.
If you want more details on the one-page synopsis, see Chapter 7, "Your Story in One Page," in my book How to Write a Novel Using the Snowflake Method.
Step 5: Explanation of Your Character Synopses
Take a day or two and write up a one-page description of each major character and a half-page description of the other important characters. These “character synopses” should tell the story from the point of view of each character.
As always, feel free to cycle back to the earlier steps and make revisions as you learn cool stuff about your characters. I usually enjoy this step the most. I find it effective to put the resulting “character synopses” into my proposals in addition to a plot-based synopsis.
Editors love character synopses, because editors love character-based fiction.
If you want more details on the character synopses, see Chapter 8, "Your People's Secret Stories," in my book How to Write a Novel Using the Snowflake Method.
However, you didn't fill in everything yet. You only filled in the character's Name, Role, Storygoal, Ambition, Values, One-Sentence Summary, and One-Paragraph Summary.
There's a lot more to your Characters than that!
Now I strongly recommend you take some time to think more about each character and write up a synopsis of that Character's storyline as if they were the Hero of the story. Just tell the story as that Character sees the story.
There is a Character Synopsis attribute in the Snowflake Method Character Template. Fill it in. Take as much space as you need.
Step 6: Explanation of Your Long Synopsis
By now, you have a solid story and several story-threads, one for each Character.
Now take a week and expand the one-page synopsis of the novel to a long synopsis of about four pages. Basically, you will again be expanding each paragraph from Step 4 into a full page. This is a lot of fun, because you are figuring out the high-level logic of the story and making strategic decisions.
Here, you will definitely want to cycle back and fix things in the earlier steps as you gain insight into the story and new ideas whack you in the face.
If you want more details on the long synopsis, see Chapter 11, "Your Long Synopsis," in my book How to Write a Novel Using the Snowflake Method.
Step 7: Explanation of Your Character Charts
Take another week and expand your Character definitions into full-fledged Character charts detailing everything there is to know about each character. Some writers call this the Character “bible.” You’ll want to include the standard stuff such as birthdate, description, history, motivation, goal, etc. Most importantly, how will this character change by the end of the novel?
This step is an expansion of your work in Steps 3 and 5, and it will teach you a lot about your Characters. You will probably go back and revise Steps 1 through 6 as your Characters become “real” to you and begin making petulant demands on the story. This is good — great fiction is Character-driven.
Take as much time as you need to do this because you’re just saving time downstream. When you have finished this process, (and it may take a full month of solid effort to get here), you should know your characters inside out.
If you want more details on Character charts, see Chapter 12, "Your Character Bible," in my book How to Write a Novel Using the Snowflake Method. In Steps 3 and 5, you already began defining your Characters by filling in the Snowflake Method Character Template for each of your Main Characters.
However, you didn't fill in everything yet. You only filled in the Character's Name, Role, Storygoal, Ambition, Values, One-Sentence Summary, One-Paragraph Summary, and the Character Synopsis.
There's much more to your Characters than that!
The Snowflake Method Character Template has some basic attributes defined for things like Date of Birth, Age, Height, Weight, and a number of other obvious ones. If you don't care about these, you can actually delete them from the template.
More importantly, you can add custom attributes. You can make your own Character template that has exactly the things you care about. Go ahead and do that first, and then fill in the charts for each Character.
Always remember that these charts are for your benefit, to help you think deeply about your Characters. Don't fill them in just because they're there. Fill them in only if they help you get a clear understanding of your Characters.
And have fun, always!
Step 8: Explanation of Your Scene List
Your next step is to take either your long synopsis or your short synopsis (or any other synopsis you may have made) and make a list of all the scenes that you’ll need to turn the story into a novel. All you need is one sentence that tells what happens in each scene.
Every scene should have a "Point of View" Character. You can set up a Timeline for each of your POV Characters.
For our purposes, every Chapter in the Timeline should be a single scene in your story. (Ultimately, when you write your novel, you'll cluster your scenes into chapters, but you can make that decision very late in your story development. For right now, just consider each Chapter as a single scene.)
It can take a week to make a good scene list. In Step 8, you only need to write up a single sentence for each scene, telling what happens. (Later in Step 9, you can flesh this out with more details.)
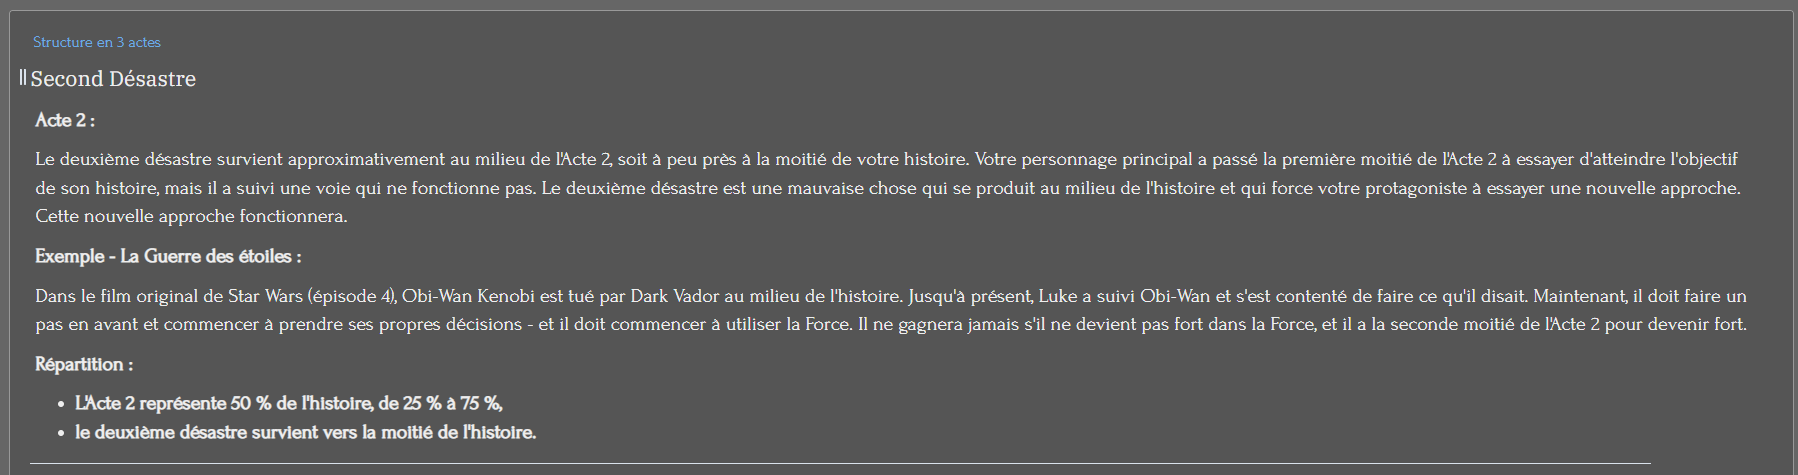
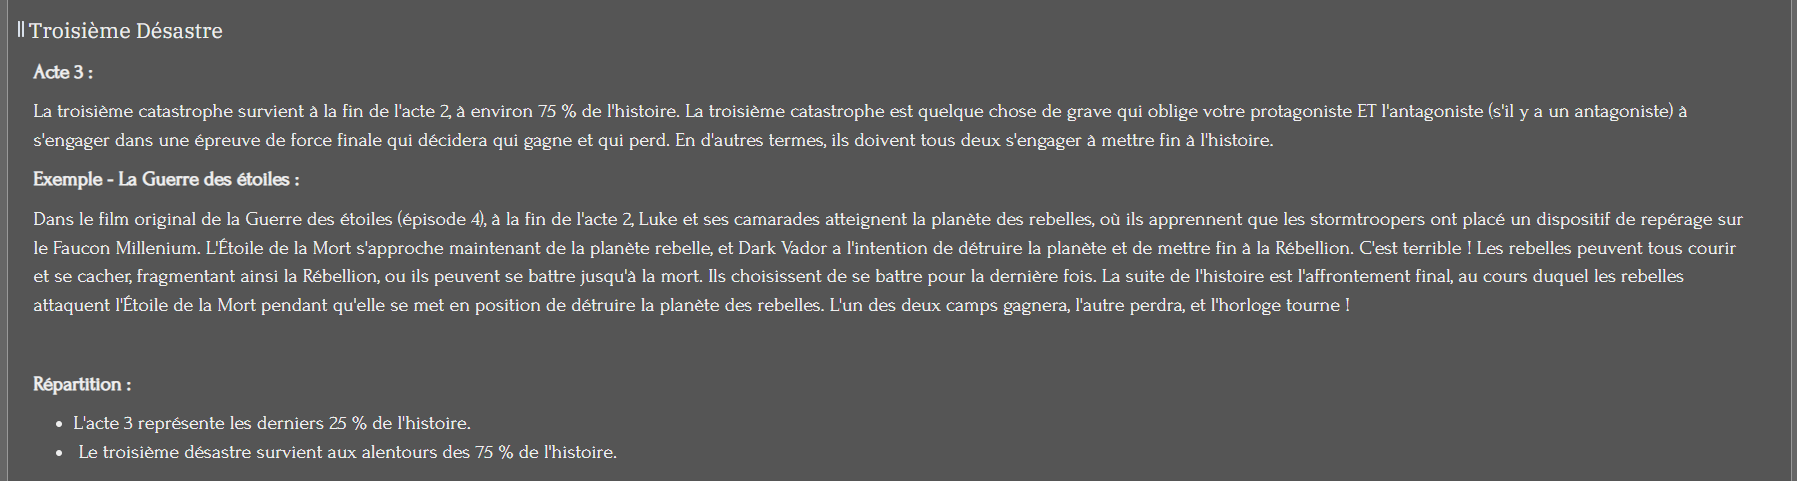
If you want more details on scene lists, see Chapter 14, "Your List of Scenes," in my book How to Write a Novel Using the Snowflake Method. That just provides you with the boundary points that mark off the three main disasters in the story. These happen approximately at the 25%, 50%, and 75% marks in your story.
If you know the Three-Act Structure, then the first Disaster comes at the end of Act 1. The second Disaster comes in the middle of Act 2. The third Disaster comes at the end of Act 2.
These three Disasters mark major turning points in your story. The first Disaster commits your lead Character irrevocably to the story. The second Disaster causes your lead Character to rethink what isn't working and to choose a new approach that will actually work. The third Disaster causes your lead Character (and the villain, if you have one) to BOTH commit to end the story in some sort of final showdown.

Step 9: Explanation of Your Scene Detail
You may want to make some extra notes about each of the scenes in the scene list that you created in Step 8. You can select any scene from the list here. If necessary, you can change the Point-of-View character and edit the summary of the scene. Then you can add any extra notes that you want to remember for the scene. You might want to write notes on the setting, characters, cool dialogue, or anything else related to your scene. Write as many notes as you need to.
Scenes generally fall into two types, and you may want to classify each scene as one of these types and make notes on the various parts:
A Proactive Scene has the following pattern:
- Goal
- Conflict
- Setback
A Reactive Scene has the following pattern:
- Reaction
- Dilemma
- Decision
The structure of scenes is very important, because the scene is the fundamental unit of fiction. If you’d like a quick survey on scene structure, see chapter 17 of my book in my book How to Write a Novel Using the Snowflake Method.
If you want to become an expert in scene structure, I've written a whole book that goes into great detail on exactly how scenes work, with lots of examples. So check out my best-selling book How to Write a Dynamite Scene Using the Snowflake Method.
If the scene is neither a Proactive Scene nor a Reactive Scene, then you should think very hard about whether this scene is pulling its own weight. Why is this scene in your story? What does it do for your story? Is it advancing the conflict? If not, maybe you don't need the scene, or you can revise it to be either Proactive or Reactive, or you can combine it with some other scene that contributes to the conflict.
Of course, you can do whatever you want, but when a scene is neither Proactive nor Reactive, that's a big red flag. Proceed with caution.
Step 10: Write Your Novel
If you've completed all the first 9 steps of the Snowflake Method, you now have a well-balanced strategic plan to write your novel.
You can now export this Plottr project to a Microsoft Word document or a Scrivener document, and that'll give you a place to start writing.
Now that you have a plan for your novel, you can write each scene with confidence. You know it's in the right place. You know it serves the story.
Write fast and write well.
And have fun!